While the AC30 Custom Classic is an excellent amp, it does have some room for improvement. Best thing is, it is very easy to make modifications. Vox did a good job of providing service information and schematics. And a lot of mods have been published very well by Lyle Caldwell of Psionic Audio - all of the mods I mention in this article originated from blog postings from Lyle (THANKS MAN!!).
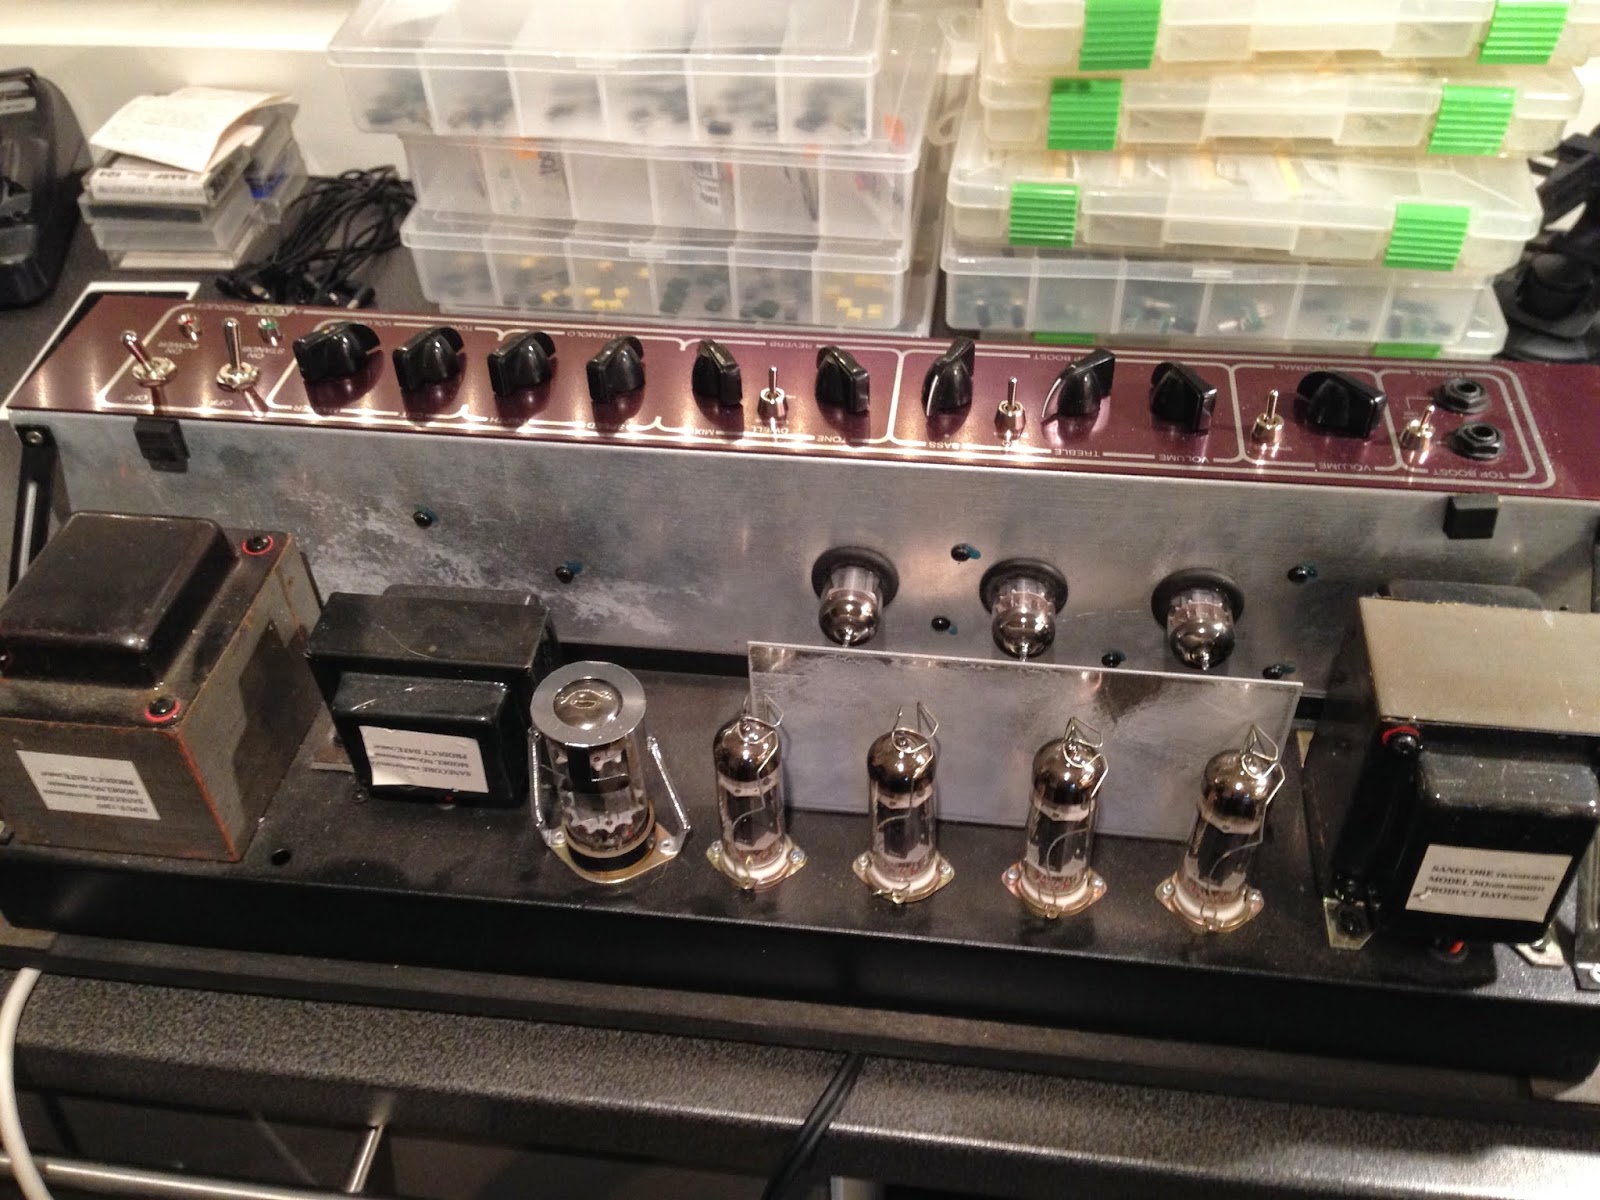 After removing the back wood panel, disconnecting the the reverb and speaker cable, there are four screws holding the chassis in place, then the chassis slides out. Unlike other amps I've worked on, the AC30CC chassis is a little different. Instead of all the tubes mounted up or down, the AC30 uses many different planes. The rectifier, power tubes and transformers are mounted up from the power board - but the preamp board is mounted vertically, with the preamp tubes extending horizontally. It's a very ingenious design, while it takes a bit of time to visualize where everything is, the layout of each PCB is very easy to view, and you can follow the circuit design quite simply. There are four main PCBs - The power section PCB, preamp PCB, control panel PCB, and the rear panel PCB - which houses the effects loop, speaker jacks and reverb I/O. The only issue I came across is that three of the chrome decorative threaded caps for the four toggle switches on the control panel PCB would not come off. I actually scratched one of them up trying to turn it and noticed that the threaded part of the toggle switch was turning with it. That usually means that the switch body itself is broken internally. I guess I'll have to desolder the switches in the future and find another way to remove them from the panel. For the modifications I am doing, I am just going to have to solder them to the visible side of the panel, seen in the picture below and be careful.
 Putting a jumper across the R49 resistor will increase the gain.
Lyle feels that the Normal channel is either way too dark or way too bright. His instructions are to change C12 from 220pF to 100pF, which will cause the channel to not be so dark with the Brilliance switch off, and putting a 68pF cap across lugs 1 and 2 of the Normal volume will lower the brightness of the Normal channel with the Brilliance switch on, but not as dark with the switch off.
 Resistors R7 and R6 are originally 100KΩ - 1/2 watt resistors. To make the amp sound/behave like a "proper AC30", these should be changed to 220KΩ.
 The previous owner installed an Accutronics reverb tank, which sounds awesome. While the Mix control works well, the reverb was actually very low in volume.... as in - not as present as in this video. I could never get the reverb level he demonstrates the "surf tone", even at full mix.
While Lyle's professional service would probably provide the ultimate amp to any AC30 owner's specifications, here is my experiences with some of the basic modifications to make my AC30 better to my own tastes. I would suggest that if you don't have experience with soldering, don't have a multimeter and don't know how to drain the capacitors so you don't accidentally get hundreds of volts coursing through your body, you should probably get Lyle or another reputable amp doctor in your area to do this work.
As a sidenote - I really wish I could find schematics and service info for my Mesa/Boogie 5:50+, I would just LOVE to change the tone stack on the Blues/Burn Channel. I really think Mesa failed on this, it is virtually useless if the gain is above 3.
Removing the Chassis from the Amp
Normal Channel Gain and Brilliance
Putting a jumper across the R49 resistor will increase the gain.Lyle feels that the Normal channel is either way too dark or way too bright. His instructions are to change C12 from 220pF to 100pF, which will cause the channel to not be so dark with the Brilliance switch off, and putting a 68pF cap across lugs 1 and 2 of the Normal volume will lower the brightness of the Normal channel with the Brilliance switch on, but not as dark with the switch off.
I found this rendered the Brilliance switch practically non-functional, and I like the variation the Brilliance switch provides.
After several experiments, I've come up with my own flavour. Setting C12 at 150pF is not as dark as the stock 220pF, but still a bit dark; and putting a 30pF capacitor on the Volume pot takes a bit of the bite away with or without the Brilliance switch engaged.
After several experiments, I've come up with my own flavour. Setting C12 at 150pF is not as dark as the stock 220pF, but still a bit dark; and putting a 30pF capacitor on the Volume pot takes a bit of the bite away with or without the Brilliance switch engaged.
Top Boost
Capacitor C13 affects the brightness of the Top Boost channel at the Volume knob. The stock cap is 120pF. Vintage spec is 100pF, but Lyle says a 68pF is more pleasing. I found a 82pF is better to me.
The stock tone stack treble capacitor at C16 is 56pF . The "vintage" 47pF value suggested by Lyle is great - the Treble in the Standard EQ setting is much more controllable.
V1 Preamp Tube Plate Resistors
Resistors R7 and R6 are originally 100KΩ - 1/2 watt resistors. To make the amp sound/behave like a "proper AC30", these should be changed to 220KΩ.
Typically, higher values in a plate resistor mean more gain. The first 12AX7 preamp tube (V1) has two sides: one side is the primary gain stage for the Normal channel, with R6 as it's plate resistor, the Top Boost channel uses the second side of V1 and uses R7 for it's plate resistor. I put in some monster-sized blue 2W 1% 220KΩ resistors on these, and I'd say this mod alone turns the amp into something new, wonderful and alive.
Effects Loop
This was the mod that I was seeking first. When you engage the effects loop at the bypass switch, you lose low end. As Lyle states, there was a typo on the original design.
This is an easy fix. Capacitor C109 is mistakenly a 220nF box capacitor. This needs to be replaced with a non-polar 2.2µF or larger electrolytic. I ended up putting in a 3µF, and it works perfectly. The effects loop is transparent and sounds great.
Tremolo Speed
I found the maximum speed of the tremolo was a bit slow for my liking. Based on the schematics available on the Internet, my amp was a very early Custom Classic. The following resistors had been changed in the design after my amp was manufactured: R38 was changed from 56KΩ to 27KΩ and R37 was changed from 270KΩ to 100KΩ.
Easy fix. Now the speed goes to full warbling craziness. The only hangup I have with the Tremolo is that it is post effects loop and reverb - it is at the very end - basically oscillating the level of signal into the power tubes. I would prefer Tremolo right after the gain stages, so reverb and echoes would not get chopped up in the Tremolo, but rather give you a wash of trails.
Reverb Modification
The previous owner installed an Accutronics reverb tank, which sounds awesome. While the Mix control works well, the reverb was actually very low in volume.... as in - not as present as in this video. I could never get the reverb level he demonstrates the "surf tone", even at full mix.
I have read that in order to make the Accutronics perform like the stock Ruby reverb tank, the following needs to be changed:
Resistor R18 needs to be replaced with a 28KΩ 1/2 Watt Metal Film, which is roughly half of the stock resistance of R18, and add 1M resistor across lugs 1 and 3 of the reverb drive switch. This causes the volume level of the reverb to be higher.
 The normal channel has a tremendous range - the super cleans shift into a bit of jangley breakup around 10:00, and then go into a smooth overdrive at 2:00. The amount of gain at full is wicked. The brilliant switch gives you that bright presence that you expect from an AC30, and is particularly nice at the 10:00 mark. Kicking it off past noon darkens it enough without muffling.
The Top Boost channel equalization modifications are more subtle, but of particular note is the plate resistor upgrade gives this channel gain for days.
The effects loop fix means I can patch in my Strymon Timeline and layer a wash of echo all over this amp without losing any tone.
Having a properly functioning reverb and tremolo is a big cherry on the cake.
This amp is a keeper.
Results
Considering the capacitors and resistors needed to do these modifications cost me less than $15, including extras and experimental values, this was the cheapest hot rod job I've ever done. I spent a little over two days experimenting, and the results are fantastic. This amp went from being really good to amazing.The Top Boost channel equalization modifications are more subtle, but of particular note is the plate resistor upgrade gives this channel gain for days.
The effects loop fix means I can patch in my Strymon Timeline and layer a wash of echo all over this amp without losing any tone.
Having a properly functioning reverb and tremolo is a big cherry on the cake.
This amp is a keeper.
Next Steps
I am considering installing a London Power SV2 Power Scaling kit. This would allow me to get the master volume up to the point of output tube clipping at studio volumes - which I haven't had the opportunity to try... And if I had the money to drop into it, maybe some speakers and Mercury Magnetics transformers. But that is a whole different level.
Comments
It does sound amazing with the mods, and for something so straightfoward in terms of parts and effort involved, the payoff is huge.
That's unclear to me. R18 is the wrong reference designator. Which resistor is the correct one?
Can you also be clearer on the 1M resistor (which are lugs 1 and 3) in the schematic?
Thank you
I was very interested to find your blog entry on this.
I had my Vox AC30CC2X modded by Don Butler a few years ago, and then had a local amp tech do the additional Lyle Caldwell mods a few months ago.
I'm fairly pleased with the Top Boost mod with the 68pf cap, but as you mentioned, the Normal Channel sounds better than stock, but the Brilliant switch essentially does nothing at this point.
I was also thinking about using a higher value cap to get some of that Brilliant switch high end back. Just to make sure I understood what you wrote, you replaced the 68pf cap on the Normal Volume pot with a 30pf? And then changed the brilliant switch cap from 68pf to 150pf?
How much darker does your normal channel sound with the 30pf instead of the 68pf?
I'm guessing there's a lot more contrast between the Brilliant switch being on and off now?
I'm also considering bumping that Top Boost cap from 68pf to 82pf while I'm in there as you suggested.
I like the Caldwell mods but feel I'd like to split the difference between those cap values and stock.
Thanks!
I put a little acetone on those toggle switch caps and within a minute they came off easily just with my fingers. Works a treat, now I have a great sounding amp AND an immaculate faceplate lol. I don’t seem to be getting as much gain from the normal channel as you guys though...oh well that’s what the top boost channel is for. I put a range booster in front of it and it sounds amazing. Eat your heart out Brian May. Beautiful cleans on the normal channel.
Cheers